Buying a new bathroom faucet is probably not the most important decision you'll ever make. I mean we'ere not talking about a car, a house, or possible even your spouse (ha, ha). Even still there are a few things you want to consider before buying the first faucet you see.
Most faucets these days are made of solid brass, well the inside of them(the guts) anyway. If you have a some pretty hard water, this is the best kind to have anyway. Solid brass is very good at resisting calcifaction and corrosion, and because of this solid brass faucets are often more expensive. If your looking at faucets and you notice one is more expensive than the other and you can't figure out why, nine times out of ten this is the reason.
In the middle of faucet types is Zinc Die cast taps, which are reasonably sturdy, but will need to be replaced after a period of time. And then at the bottom of the barrel is the ever popular plastic faucet. These are the bottom of the line faucets that you will find in many apartment buildings.
Probably the most important part of choosing a faucet for your bathroom with the concern of wasting your time returning them before you get the right one. You must get one that fits the amount of holes in your sink as well as knowing how far apart they are. Most sinks have two or three holes while most faucets need two, one for the hot and one for cold water. If your sink has three holes and you only need two, that is fine. As long as you have more holes than you need, everything should be fine.
If your going to be replacing the faucet anyway, it is fairly easy to remove the faucet to see how many holes are in your sink. Make sure you turn off the shut-off valves under your sink, then simply unscrew the clamps on the hot and cold pipes which clamp the faucet to the sink. Now you should be home free. If you have any questions about this procedure, you can check out our article on replacing your bathroom faucet or right a comment here and we will do our best to answer your question.
Showing posts with label bathroom faucet. Show all posts
Showing posts with label bathroom faucet. Show all posts
Friday, February 19, 2010

Thursday, February 11, 2010
County Employee's Receive Award for Installing Efficient Faucets
William Edson and his co-workers received the Pitt County Employee Incentive Award at the Board of Commissioners meeting in January for minimizing costs and creating efficiencies at there respective state departments. Edson works at the Pitt County Detention Center and recognized the need for faucets that control the water supply and temperature. The newly installed bathroom faucet collection turn off automatically and prevent employees from having to check for running water which is unattended. Cutting down on utility costs.
The PCEIP or Pitt County Employee Incentive Award Program was first adopted in 2001. The program rewards employee's of Pitt County in North Carolina for reducing costs and providing excellent service to its citizens which also helps increase communication and new ideas in the workplace.
The PCEIP or Pitt County Employee Incentive Award Program was first adopted in 2001. The program rewards employee's of Pitt County in North Carolina for reducing costs and providing excellent service to its citizens which also helps increase communication and new ideas in the workplace.
Monday, January 11, 2010
Water pressure low from residence running their bathroom and kitchen faucets in Lafourche, Louisiana
Over this past weekend, a winter wonderland has pumbled the south east with freezing cold weather. It has barely gotten above freezing in the middle of the day through out the south east. To keep the pipes in people's homes from freezing, many people are running the kitchen faucets and bathroom faucets ever so slightly to keep the water flowing. So many people are letting their faucets drip that the water pressure has become dangerously low in Lafourche, Louisiana. Officials say that the low pressure condition can increase the risk of infectious bacteria in the water. It is recommended that residence boil their water before drinking it to sterilize it from bacteria.
If you are in the market for a new bathroom faucet or kitchen faucet, check out our selection at TheKitchenFaucet.com
If you are in the market for a new bathroom faucet or kitchen faucet, check out our selection at TheKitchenFaucet.com
Monday, January 4, 2010
Florida stumbles over its own feet with water conservation and energy efficiency
Lee County in Florida is facing a common problem with many other states when it comes to implementing with use of renewal resources along side our current use of fossil fuels. Since some states only have one or two power companies, these companies have to be heavily regulated. To stop these companies from having geo-isolated monopolies over their regions, the cost of energy is set at a settled upon price.
Since the energy company’s revenues are heavily regulated, they don’t have much room to invest in new technologies. One logical idea to this problem is creating cheaper to generate power in more efficient ways. Eric Draper of Autobon says “Consumers know that it is not the rate per kilowatt that matters. It's the cost of the kilowatts used. If electricity can be generated with renewable sources and used more efficiently, bills will come down now and in the future.”
TheKitchenFaucet.com is an advocate of water conservation. If your in the market for a new bathroom faucet, Check out our discount bathroom faucets today.
Tuesday, December 29, 2009
Removing the Old Bathroom Faucet
Now that we are finally done with the drain and everything is working properly with no leaks, we can start installing the actual bathroom faucet. The first thing we want to make sure we do is turn off the water flow valves under the sink. Turn the valves clockwise until they won't turn anymore, and then test it by trying to turn the water on from the faucet. If it no workie than we are good to go.

Installing a new faucet while the sink isn't installed yet in the bathroom is much easier than replacing one. This is just because now we have to get under the sink like we are working under a car. You will probably want to use a pillow under you because those cabinet corners will really hurt your back otherwise. There is not to much to this step so if you do it right, you won't be under the sink long.
First you need to disconnect the sink hoses from the copper pipe of the bathroom faucet. Most plumbers will use a pipe wrench here, but I find its better to use vice grips because you can lock them down to the nuts and free your hands to get up and do something like reading these instructions. Look in two vice grips as shown in the picture. Hold one vice grip and turn the other one clockwise. This should loosen up the nuts. As you can see in the picture, these might have been glued together because it never came loose. I turned it until it twisted the copper pipe until it snapped. This is ok since this was the old bathroom faucet.
Let the loosened nut fall to the bottom of the sink hoses as we will need them later. Now the last thing is to disconnect the faucet from the sink. There should be two nuts clamping the faucet to the sink. Normally these are directly below the hot and cold knobs. Turn these clockwise and the faucet should come loose of the sink.
That should be it. Remove the faucet and clean up the area to install your brand new bathroom faucet. If you have any questions about this part, feel free to ask a question in the comments section. Next we will install the new bathroom faucet. Until then take a look at our wide variety of bathroom faucets at TheKitchenFaucet.com.

First you need to disconnect the sink hoses from the copper pipe of the bathroom faucet. Most plumbers will use a pipe wrench here, but I find its better to use vice grips because you can lock them down to the nuts and free your hands to get up and do something like reading these instructions. Look in two vice grips as shown in the picture. Hold one vice grip and turn the other one clockwise. This should loosen up the nuts. As you can see in the picture, these might have been glued together because it never came loose. I turned it until it twisted the copper pipe until it snapped. This is ok since this was the old bathroom faucet.
Let the loosened nut fall to the bottom of the sink hoses as we will need them later. Now the last thing is to disconnect the faucet from the sink. There should be two nuts clamping the faucet to the sink. Normally these are directly below the hot and cold knobs. Turn these clockwise and the faucet should come loose of the sink.
That should be it. Remove the faucet and clean up the area to install your brand new bathroom faucet. If you have any questions about this part, feel free to ask a question in the comments section. Next we will install the new bathroom faucet. Until then take a look at our wide variety of bathroom faucets at TheKitchenFaucet.com.
Tuesday, December 22, 2009
Getting Ready to Install the New Drain Assembly of your Bathroom Faucet

Most of the time when your installing a bathroom faucet, the flange is down pretty far into the J-Pipe so you might have to loosen up some of the other plastic nuts further down the line to turn the J-Pipe down and sideways to remove the flange. This is shown in the picture above. If you can do what is shown in the picture, you might be able to get the flange pipe out without dumping the water from the J-Unit Pipe.
Also, when removing the flange from the J-Unit, make sure you retain the plastic washer just under the giant plastic nut. This part goes with the J-Pipe and remember which way it is facing on the flange as you will need to put this on your new flange.
Alright, you are finally finished with the worst part of installing your bathroom faucet. Clean up the drain whole around the sink, grab you new flange from your new faucet set and we will start on the actual install of the drain assembly of your bathroom faucet.
In the mean time if you are interested in a bathroom faucet for your home, you can find some on our website at TheKitchenFaucet.com
Tuesday, December 15, 2009
Installing a Bathroom Faucet | Introduction

A couple of tools you are going to need for this project are:
· Pillow(something soft to rest your back on)
· Big Screw Driver
· Water Bucket
There are actually two parts to installing a faucet which some people don’t realize until it is staring them in the face. Installing the actual faucet and we also have to install the new drain and flange shown here.
It doesn’t matter which part you tackle first, but personally I like to get the dirty work out of the way so I can enjoy the fun part later. So that is what we are going to do here. The professional way to remove this by using a Pipe Wrench to turn the bottom part of the drain, but most DIY’ers don’t need a pipe wrench on a daily basis. The Pipe Wrench can be easily substituted for a vice grip, which always comes in very handy for many projects. The Flange and drain are screwed together to create a firm grip around the actual porcelain sink. Grabbing a hold of the drain can be a little frustrating if you don’t know what your doing. Luckily you have me here to help.
Tomorrow we will start the steps for installing a new bathroom faucet. In the meantime, you can check out our wide variety of bathroom faucets at TheKitchenFaucet.com
Tuesday, November 24, 2009
Kingston Brass Bathroom Faucet | Lever Handles
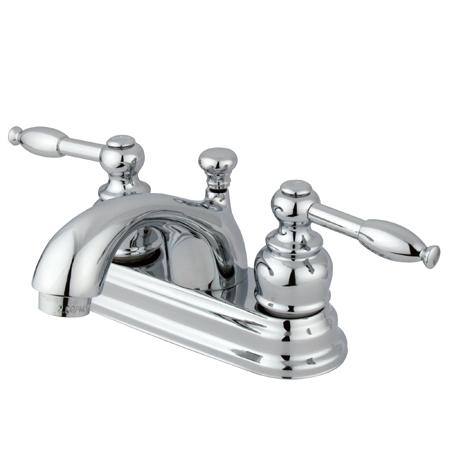
This week at theKitchenFaucet.com we would like to review Kingston Brass' 4" Centerset Lavatory Faucet with the Polished Chrome Finish. This bathroom faucet is a great addition to make your bathrooms look fabulous. Whether you've moved into a new house and need some upgrades or you just want a nice new addition to that old style bathroom. This faucet will do the trick. Its got Knight Lever Style Handles with Brass Construction for long lasting durability. A lifetime premier finish which comes in Satin Nickel, Polished Chrome, or Oil-Rubbed Bronze. It fits a 4" Centerset sink and has a 2 gallon per minute flow rate.
Tuesday, October 27, 2009
Installing the New Flange
This weekend my wife and I were doing some clean up and repairs around the house and one thing we needed to fix was the basket at the bottom of the kitchen sink. Our old basket was broken in half and seeing as there was almost no possible way to fix it, we had to go out and get a new one :) I guess I could have used some super glue and jerry rigged it back together, but that wouldn't be any fun so we MUST PURCHASE NEW STUFF. Much more fun, right?
So in order to remove your old flange, your going to probably need a couple of pipe wrenches to get around the drain. One to hold the top part and one for the bottom. Another problem you might run into would be holding the the top part of the drain in place with a big screw driver or something. There is a tool used to do this, but normally the two pipe wrenches should do the job.
If your looking up at the sink from underneath, turn the lower piece holding the drain pipe up clockwise until it comes loose. That will remove the drain from the lower pipe drain. Now for the top one. It's pretty easy, just make sure the top of the sink drain isn't moving while you turn the giant nut underneath to get it off.
Before you go ripping it out from under the sink, make a note of where the different pieces are when taking it apart. Believe me, it will save you probably an hour of undoing the new again because you put something on upside down.
We hope this helps with your quest of a clean sink. If you ever need a kitchen faucet, bathroom faucet, or shower head, check out our shop at TheKitchenFaucet.com
So in order to remove your old flange, your going to probably need a couple of pipe wrenches to get around the drain. One to hold the top part and one for the bottom. Another problem you might run into would be holding the the top part of the drain in place with a big screw driver or something. There is a tool used to do this, but normally the two pipe wrenches should do the job.
If your looking up at the sink from underneath, turn the lower piece holding the drain pipe up clockwise until it comes loose. That will remove the drain from the lower pipe drain. Now for the top one. It's pretty easy, just make sure the top of the sink drain isn't moving while you turn the giant nut underneath to get it off.
Before you go ripping it out from under the sink, make a note of where the different pieces are when taking it apart. Believe me, it will save you probably an hour of undoing the new again because you put something on upside down.
We hope this helps with your quest of a clean sink. If you ever need a kitchen faucet, bathroom faucet, or shower head, check out our shop at TheKitchenFaucet.com
Subscribe to:
Posts (Atom)